While they have their differences, epoxy and polyaspartic floor coatings are both beautiful and durable flooring options for your home or workplace. A lower cost is obviously tempting, but we do not recommend attempting a DIY installation for many reasons. However, if you’re not discouraged or are simply interested in how it’s done, this article outlines a step-by-step process for epoxy and polyaspartic floor installation.
It’s a complex topic, so if you have more questions after reading this piece, do not hesitate to reach out to our professional team for more information.
To get the best results, you’ll need the proper tools. These tools will help you prepare the floor, acid etch the floor, and apply the resin in an even coat.
Make sure that you have the following tools at the ready before applying your resin:
So, you have your tools, but the question remains: how are epoxy and polyaspartic floors installed? Even before beginning the installation process, you’ll want to determine which is the best resin for your project. Epoxy and polyaspartic floor coatings have key differences, especially in regard to their durability and affordability, but they are generally very similar in their installation process.
Epoxy, however, is often quicker to install than polyaspartic. Polyaspartic installation can also result in air bubbles, uneven installation, and separation from the base concrete if not done properly. When it comes to resins, there are three main types: solvent-based, solid, and water-based resins.
Solid resins are very difficult to apply because they dry very quickly, which means you won’t have any extra time to fix errors or take a break. Solid resins should only be applied by a professional who can apply the resin quickly and without error.
Solvent-based resins don’t dry as quickly as solid resins, but they still offer challenges. Solvent-based resins can give off powerful, dangerous fumes which can be harmful to your health. If you’re applying solvent-based resins, you’ll need to wear a ventilator and keep the area ventilated, as well as keep any pets or children away from the area.
Water-based resins are similar to solvent-based products, but they do not give off harmful fumes. They are also frequently sold at home improvement stores and other locations, making them easy to find and buy. If you’re applying resin for the first time, you should consider using a water-based resin to avoid any injuries or issues.
Now, let's dive into the meat of today's topic: the actual installation process:
Your solution is selected; now it’s time to begin installation. Start by ensuring the environmental conditions are optimal for epoxy and polyaspartic coatings. Too much humidity or extreme temperatures are not ideal and can cause improper curing, poor adhesion, bubbles, brittleness, discoloration, and cracking. This is especially true when considering the harsh weather of Colorado, with bright sunny days that can turn to brutally cold snow and wind over the course of a day. Your new polyaspartic driveway or pool deck will also not be successful if installed during a 10-degree January morning.
With good installation conditions, you can begin to prepare the surface. This involves cleaning the floor thoroughly to remove any dust, dirt, or stains.
Start by using the scraper, grit blaster, or diamond grinder to remove any hardened material. This includes old paint, glue, and extra cement. Once you’ve removed any hardened material from the floor, use the vacuum to clean any other dirt and debris easily.
After vacuuming the floor, make sure to use a cleaning or degreasing agent to remove any oil stains or spills. Once you’ve cleaned any stains, use your power scrubber to clean the rest of the floor thoroughly. Once you’ve cleaned the whole floor, use the rubber squeegee to collect the solution and use the vacuum to remove the solution.
If you come across any cracks, chips, or other damage to the concrete, you will need to repair these. A fast epoxy repair mortar can be used.
For a similar purpose of surface preparation, there are steps that can be taken to improve the overall application/ adhesion, primarily through primer or etching.
We recommend using a primer to deal with any potential contamination and help achieve an effective bond. The primer should be applied before the epoxy floor coating: spread it evenly and allow it to cure before adding any other coats.
You might also see tips online suggesting the use of acid etching. We don’t usually recommend this option as it has the potential to leave a residue that will impact the quality of the bond, but if done correctly, it’s an extremely effective technique for floor preparation and bond effectiveness.
If you are considering acid etching, the first step is to ensure the floor is wet. The acid will eat too far into the concrete if it is not wet and will change the appearance of the concrete.
Spray the floor with a garden hose to wet the concrete, but do not create any puddles.
Mix one part of muriatic acid with three parts of water. Typically speaking, a quarter-gallon of muriatic acid is enough to cover an area of four to six square meters when properly diluted. Make sure to add the acid to the water instead of adding water to the acid. This prevents incidents of acid splashing back onto your skin and causing injury.
Once mixed, use a plastic watering can to distribute the solution evenly over the area. After applying the acid, wait between 10 and 15 minutes for the acid to eat into the concrete. After the floor has been etched, rinse off the floor three times to remove the acid from the concrete. Let the floor dry overnight before applying your resin epoxy.
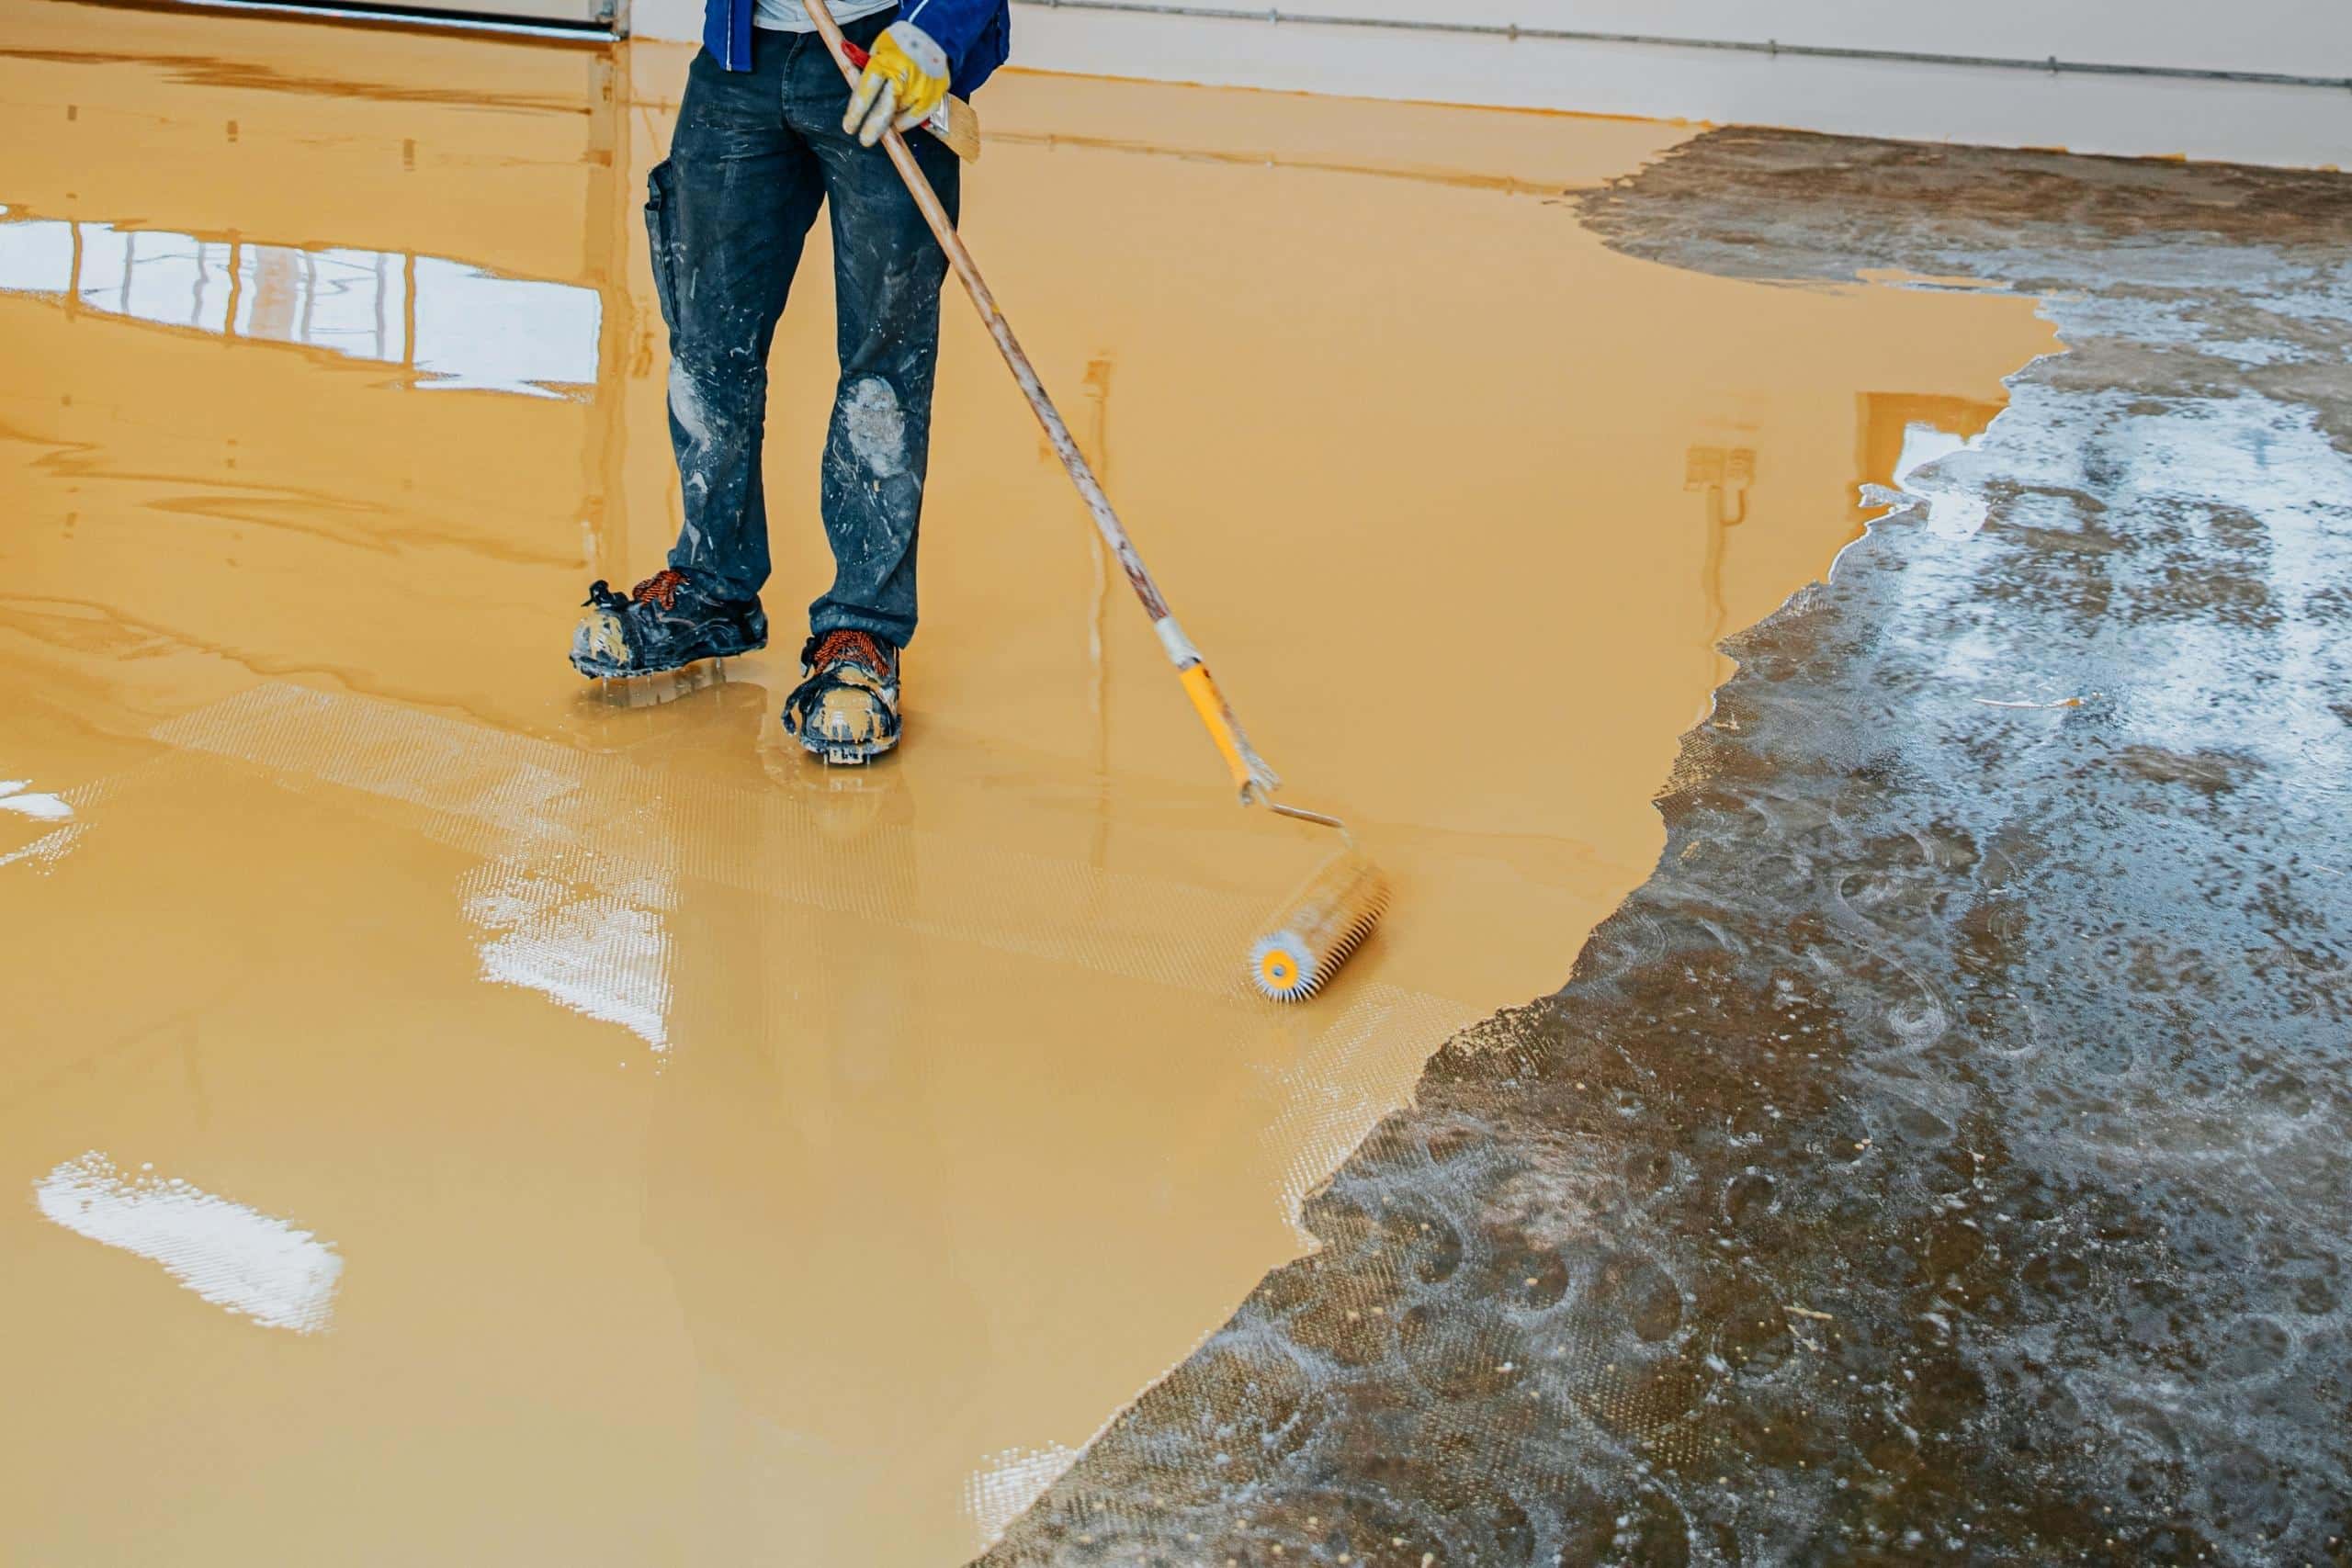
Now, it’s time to create the epoxy or polyaspartic mixture. Epoxy flooring usually comes in two parts: a base component and a hardener. You need to open the base and hardener components and mix them independently before adding them together in the larger container. With some products, the container will not be big enough, so we suggest having a clean bucket at hand.
Thoroughly mix the two components together (proportionally according to the directions supplied) using a mixing paddle attached to an electric high-speed drill. Do this for a minimum of two minutes and until the mixture is streak-free and all one color.
You should not leave the coating in the container but instead transfer it to a large roller tray, ready for rolling. Some people prefer to pour the coating directly onto the slab and roller from there.
Polyaspartic coatings, on the other hand, are made of a combination of resins, catalysts, thickeners, and other additives. This allows polyaspartic coatings to cure in as little as 1 to 2 hours, but it also means that the mixing process is much more complex.
After creating your mixture, the next step is to apply it to the surface in question. It’s critical that you follow the manufacturer’s directions as closely as possible, but we generally recommend a cross-rolling method or something similar.
The cross-rolling method involves moving your roller vertically (front to back) and then horizontally (left to right). The trick is only coating your roller once per cross-rolling section for a smooth, even coat while eliminating any bubbles.
Do note that once you’ve made the mixture of epoxy or polyaspartic coating, you’ll only have about 30-45 minutes to apply it to the surface before it becomes unusable.
After applying the first coat, this is the time to incorporate any desired additives. Chips for decorative or anti-slip purposes are a common addition to epoxy and polyaspartic coatings, and they need to be added at this time while the first coat is still wet.
Add as many chips as the wet coating can hold, wait for it to cure, then scrape and vacuum up any remaining loose chips.
If you do decide to add chips, you’ll also need to scrape and sand down any rough spots that remain in order to prepare the surface for the top coat.
In a similar fashion to the first coat, a second coat will need to be applied. This layer works as a glossy, protective overcoat to help the flooring resist wear and tear.
Once again, ensure that this coat is spread evenly with a good rolling technique and a squeegee for fine details.
Once you’ve finished applying the second coat, your new floor must be given enough time to cure (harden) before any type of use. This process will usually take a few hours to several days, depending on the product you decided upon originally, along with environmental conditions. Polyaspartic coatings will cure much faster than epoxy—generally in as little as 24 hours. Epoxy floors, on the other hand, can take up to a week to cure in most climates.
As a rule of thumb, even though your floor may be dry and ready to walk on before it is fully cured, it's best to avoid driving or parking vehicles or placing heavy furniture on the surface until the curing process is complete. This will help you avoid any unwanted impressions and defects on your new floor.
This article is meant to be an overview of how epoxy and polyaspartic floors are installed. Installing these flooring types is much more complicated than most people know, and while you can do it alone, you don’t have to (and shouldn't if you want a high-quality result).
From preparing your floor to mixing the new coating, there’s much to be aware of. But whether you’re in Colorado Springs, Denver, Northern Colorado, or beyond, our team is here for you. Keep peace of mind that your floors will be installed to the highest professional quality and standards by contacting the experts at Epoxy Colorado today!
;)
;)
;)